Pages

Monday 25 August 2014

Some days..........

Hi crafters it is Naomi here with a fun journal page to share with you all.


I had a lot of fun doing this page and here is a step by step of how it came together.

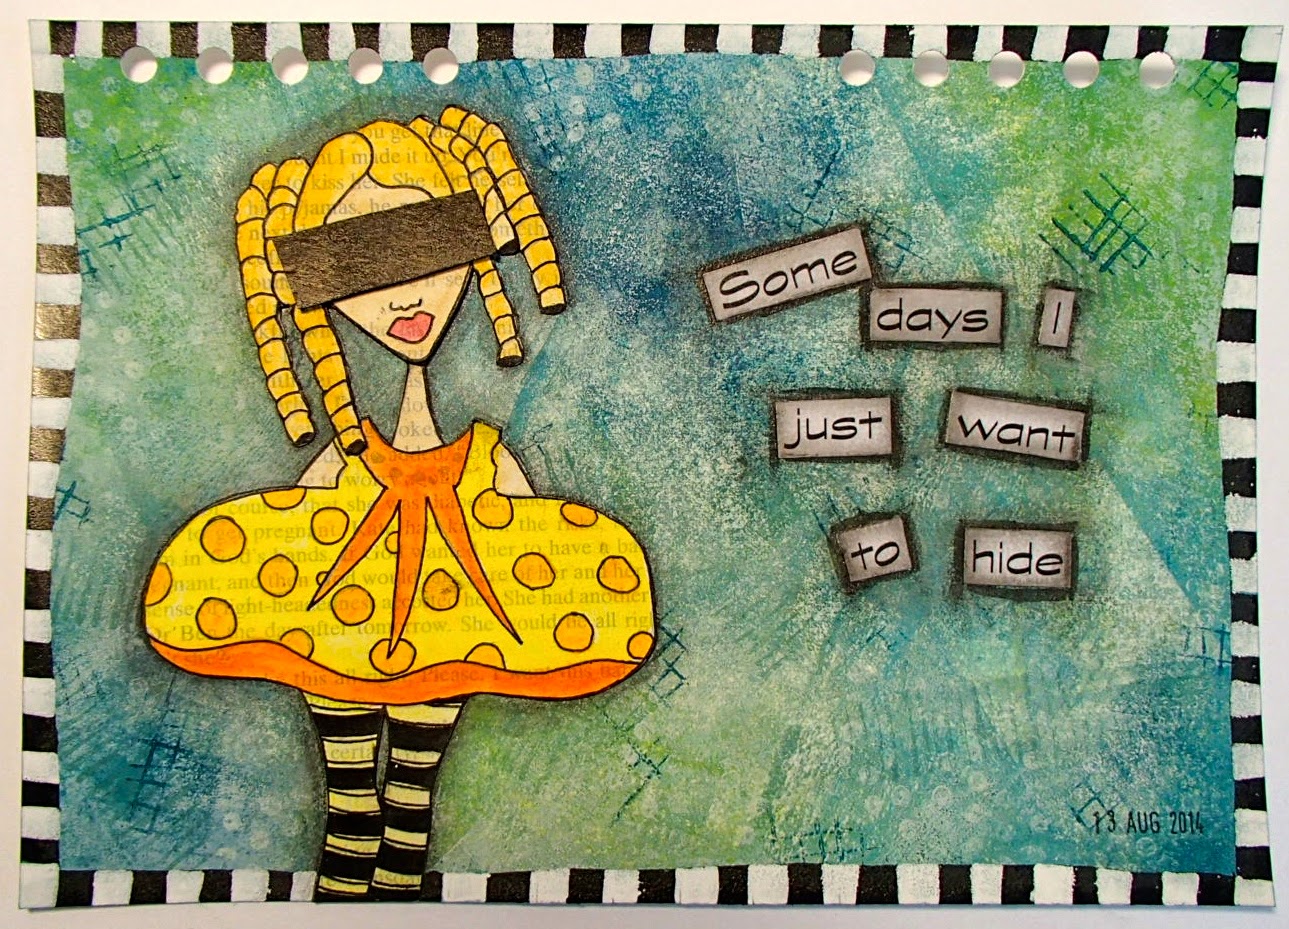
I started out by creating a background using Inky Pool, Bora Bora, Dusty Teal, Mermaid, Limelight and Nougat Fresco Finish paints with a brayer and layering the colours until I was happy with the finish. I then used a couple of the stamps from Ellen Vargo collections to create some texture and interest on the background.


I then set this aside while I worked on the focal image which is from the Dylusions Curious Corin set. I stamped out the main image onto book paper which I had adhered to card stock with gel medium to give it a bit more stability. I then gave the whole thing I light coat of gesso and once this was dry I used my Inktense pencils to colour the image and then cut out.


This was then adhered to the background piece and I attached another mask piece over the eyes which I had blacked out. I then used my black and white paint pens to add a border around the piece.


I used my computer to print out the phrase and then cut it into smaller pieces and adhered to the page using matte medium and then outlined the words with a black big brush pen to help them pop off the page. The last thing was to add the date in the bottom corner.


 Here is a list of the products I used:
Arches 140lb water colour paper
PaperArtsy Fresco Finish chalk paints - Inky Pool, Bora Bora, Dusty Teal, Mermaid, Nougat
PaperArtsy Eclectica3 - EEV05, EEV06
Dylusions - Curious Corin
Derwent Inktense pencils
Faber Castell black big brush pen
Sharpie white paint pen

I hope you all have a great week

Naomi x

Sunday 10 August 2014

An Art Journal Book Cover

Hi all, welcome, my name is Anne, and this is my first post as a member of the design team for  Crafters Cupboard

Today I would love to share with you an "Art Journal" book that I have made for myself using a blank cover that I had in my stash.


I started off by covering the whole cover in gesso.


From there I applied some Paper Artsy grunge paste through various stencils including TCW287s (Mini Burst), TCW436s (Mini Skyline), TCW467s (Mini Love, Live, Laugh) and THS018 Doily  from the Tim Holtz collection.  I also used some other stencils used from my own stash for two of the words on the front cover (the Journey) and two words on the back cover (travel journey)

Stencils front cover TCW467s. Spine THS018

Stencils back cover TCW 287s & TCW436s

After  adding the stencilling I then applied a light covering of Paper Artsy Fresco Paint "Stone" then I applied some "Very Berry." I then decided it needed a bit more, so using a stipple brush I applied a liberal coat of  "Stone, Very Berry and Claret" until I was happy with the overall effect.


After heat drying I then used Rangers Distress Ink "Black Soot" to  distress all the edges. I also used one of my favourite mediums which is "Treasure Gold" using the colours "White Fire and Spanish Topaz" to highlight all the stencilling and edges. When I was happy with the effects of the distressing and application of treasure gold, I added some stamping. I used the stamp set "Hot Picks HP1301EZ" from Paper Artsy.


From there I distressed the inside of the cover with "Black Soot" distress ink.


When I was happy with that, I added a bow to the front cover using some matching coloured ribbon from my own stash.

I cut out some printed paper from my Paper Artsy paper collection "Thordon Hall." I  then applied a light covering of "Victorian Velvet" distress ink, scrunched the paper a little to age it, and again lightly applied some "Black Soot" distress ink to highlight all the creases in the paper. I also re applied the "Black Soot" distress ink to all the edges. I heat dried the distress ink before I applied some more Treasure Gold to the edges.


Inside cover

I re-stamped the butterfly using the same stamp on the front cover, cut it out and coloured it in using the same colour paints used for painting the cover.After all of this was done I attached my butterfly over the butterfly stamp on the front cover using pop dots to give a 3 dimensional look.


I then cut out a bundle of 190gsm paper to make into the pages for my mini art journal.


I hope that you enjoy this "Mini Art journal" as much as I  have in making it. I'd love to see any creations you make using this great idea for creating an Art Journal cover.

Until next time,
Cheers,
Anne


Monday 4 August 2014

Gypsy Card

Hello everyone!
I’m Lynne and this is my first ever online project! I am so excited to be on the Design Team for Crafter’s Cupboard and have the opportunity to play with the wonderful products they have to entice and inspire the creative process.
Here is a mixed media card using a Paper Artsy Hot Picks stamp set and some Lindy’s Stamp Gang sprays that have been applied with a dropper. There is always an unpredictability when using a spray or a dropper. This is the exciting part for me, when the medium seems to have a life of its own. Be brave and give it a go. I think you will be pleased with the result.

Here is a list of what I used:
Versafine Vintage Sepia stamp pad
Paper Arsty Chatsworth paper or similar vintage paper
ivory cardstock
gold cardstock
vintage dictionary page
matte medium
Just Gold Alison Ellis Design embossing powder
washi tape or vintage ribbon
white gesso
brown brush marker
Here are the steps I followed:
1.       Cut a 10cm X 20cm piece of ivory cardstock and a 10cm X 20cm piece of Paper Artsy Chatsworth paper. Using matte medium join them together back to back for strength.
2.       Stamp the script background stamp from Paper Artsy 1304 on the right hand side of the Chatsworth paper using Versafine Vintage Sepia stamp pad.

3.       Stamp the face from Paper Artsy 1304 on a spare piece of ivory cardstock.

4.       Fussy cut around the face and the straight edges along the side and lower edge of the stamped image.
5.       Tear a piece from a vintage dictionary page (approx. 4cm wide x 10cm tall).
6.       Create a collage using the face image and the dictionary piece on the Chatsworth and script background. Use matte medium to paste in place. Apply matte medium over entire card.

7.       Shake up Lindy’s Stamp Gang Starburst Grab a Guy Gold and using an eyedropper filled with the medium in your right hand and holding the card at an angle with your left hand, drop the medium onto the card around the hairline and allow to run to the right side of the card. (I used a little tray to catch the drips.)

8.       When dry, repeat with Lindy’s Stamp Gang Vintage Moon Shadow Mist Tawny Turquoise. Pick up some of the excess medium with a small paintbrush and paint in any remaining parts of the stamped hair.

9.       Stamp one of the smaller coins from Paper Artsy 1304 on a scrap of Chatsworth paper with Versafine Vintage Sepia stamp pad and heat emboss with Just Gold Alison Ellis Design embossing powder. Cut around the outside of the image and apply below the ear using matte medium.

10.   Cut a strip of gold cardstock 5mm wide and paste in place. Add some washi tape.
11.   Smudge a little white gesso over the face with your finger to tone down the text. When dry add a light wash of diluted sepia ink for shading.
12.   Crisp up the design with a brown brush marker by drawing around the profile and the hairline.

13.   Cut gold cardstock to fit the card adding a 5mm border all around.
 I hoped you liked my project and got inspired to give it a go!

Thanks Lynne